
Your store profile is the first thing shoppers see when they visit your booth on e-SwapMeet. Keeping it complete and up to date builds trust and helps buyers decide to shop with you. This guide walks you through how to update your store profile, including your store name, banner, profile picture, contact info, bio, and social links.
Table of Contents
How to Update Your Store Profile Settings
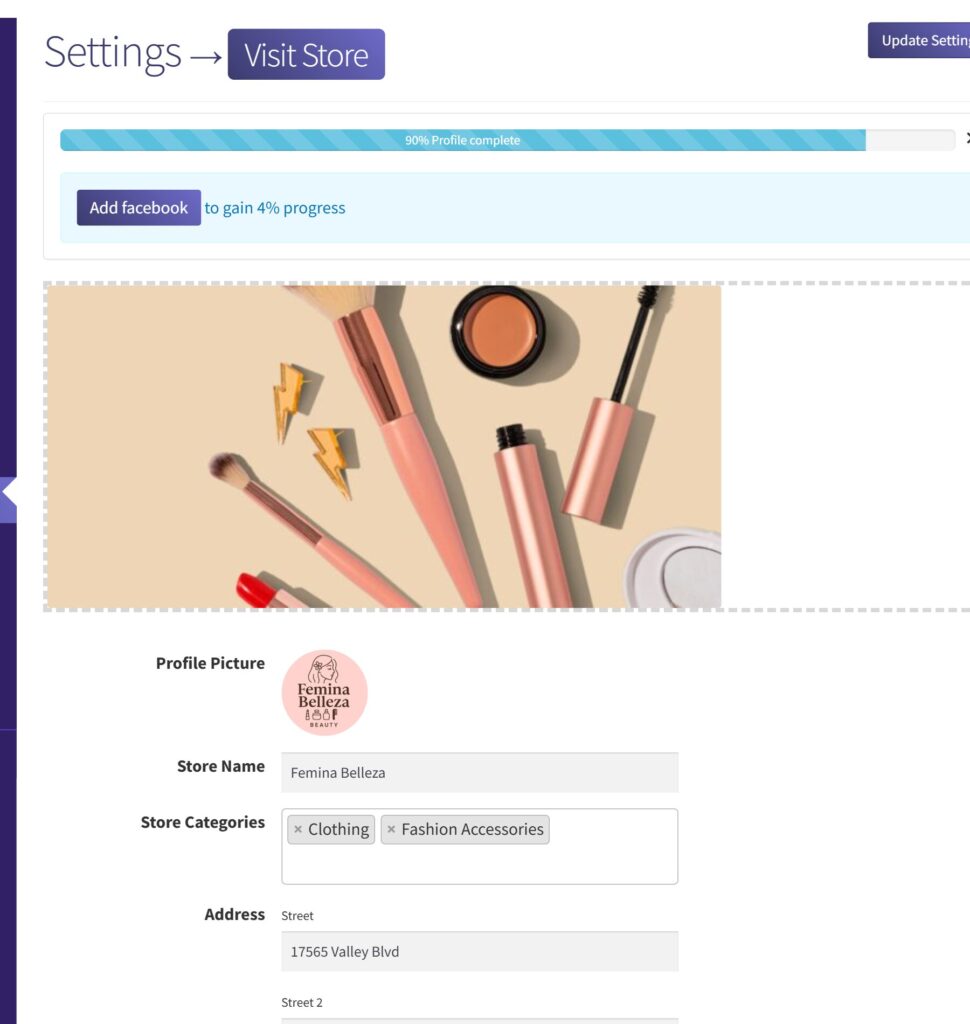
Log in to your vendor account and go to your Vendor Dashboard. In the left sidebar, click Settings. A submenu appears with two options: Store and Social Profile. Click Store to open your main store settings page.
You can also reach it directly at: e-swapmeet.com/dashboard/settings/store/
Store Banner
At the top of the settings page is the banner area. Your store banner is the wide image that appears across the top of your storefront page.
- Click Upload banner to choose an image from your device.
- Recommended size: 2560 x 1200 pixels. Larger images will be cropped to fit.
- Use a JPG or PNG file. Keep the file size reasonable (under 2MB) for fast loading.
- To remove an existing banner, click the x in the top-right corner of the banner image.
A banner is not required, but adding one makes your store look professional and helps it stand out in search results.
Profile Picture
Below the banner is the Profile Picture field. This is the small square image that represents your store across the site, including on product listings and search results.
- Click Upload Photo to select an image.
- Use a square image for best results (at least 150 x 150 pixels).
- JPG or PNG format accepted.
Store Name
The Store Name field sets the public name of your store. This is the name shoppers see on your storefront, on your product listings, and in search results. The field is required. Your store name also becomes part of your store URL, so choose something recognizable and consistent with your brand.
Address
The address fields are used for your store location. You do not need to enter a home address. Many vendors enter their city and state only. The fields available are:
- Street 1
- Street 2
- City
- Postcode / Zip
- Country
- State
Showing a general location helps local shoppers know you are nearby and available for local pickup.
Phone No
The Phone No field is optional. If entered, it appears on your storefront page so shoppers can contact you directly. Format: +123456...
Email Visibility
The Email section contains a checkbox labeled Show email address in store. Checking this box displays your account email address on your public storefront. This does not change your email address. To change your login email, go to My Account then Account details. See How to Change Your Email or Password for step-by-step instructions.
Biography
The Biography field is a short description of your store. It appears on your storefront page under your banner and is visible to all shoppers. Use it to introduce yourself, describe what you sell, and give buyers a reason to follow your store. When you update your store profile, this is one of the most impactful fields to fill in.
Keep it short and specific. Vendors who include a bio that mentions their product types (for example, “tools, electronics, and household goods from local liquidation”) tend to build trust faster with new shoppers. For more on setting up your store from scratch, see How to Set Up Your e-SwapMeet Store.
Saving Your Store Settings
When you are done making changes, scroll to the bottom of the page and click Update Settings. The page reloads and your changes go live on your storefront immediately. There is no pending review, so you can update your store profile as often as you need to.
How to Update Your Social Profile Links
Social profile links are managed separately from the main Store settings. In your vendor dashboard sidebar, click Settings then Social Profile.
The Social Profile page lists the following networks, each with a URL input field:
- X
- Youtube
- TikTok
- Flickr
- Threads
Enter the full URL for each network you use (for example, https://www.instagram.com/yourhandle). Leave unused fields blank. Click Update Settings to save. Your social links appear on your storefront page so shoppers can follow you on their preferred platform.
For more on building out your vendor presence, Dokan has a vendor dashboard introduction that covers the full settings panel in detail.
Frequently Asked Questions
Can I change my store URL?
Your store URL is based on your store name and is set when your account is created. Contact e-SwapMeet support through the Contact page if you need your store URL updated.
Do profile changes require admin approval?
No. Store profile edits, including banner, profile picture, bio, address, and social links, go live immediately after clicking Update Settings.
My banner looks cropped. What size should I use?
The configured banner size for e-SwapMeet stores is 2560 x 1200 pixels. If your image appears cropped, resize it to those dimensions before uploading.